Before you start your work,There are pre-requisite steps that need to follow.
First, you should have data base installed in your machine/should have Creadentials of other database.
Orace XE is a very light database,we can use it to start a work.
Creating Master Repository
Security information and Topology information(Physical Schema OR Logical Schema information)
are kept in master repository.
I have installed XE in my local machine and has a schema SYSTEM.
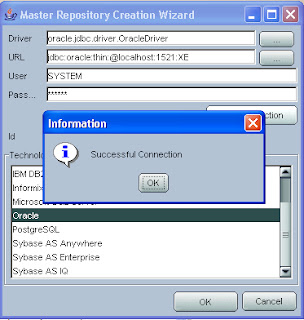
To create master repository,
Start menu-----> All Programme---->Oracle------>Oracle data integrator---->
Repository Management ---->Master Repository Creation. Enter details,
Click on test connection,It should successful.Click OK,it will be created in few seconds.
Once Master Repository created ,We have to create Work Repository.
Creating Work Repository
Your work(We will see that ProcedureInterface/Package) will be stored into work repository.
To create Work Repository,
Start menu-----> All Programme---->Oracle------>Oracle data integrator---->
Topology manager.
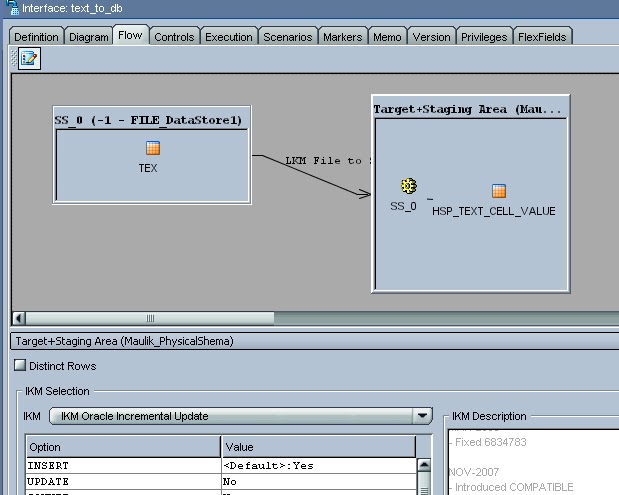
***Physical and Logical schema are like body and soul,they are link to each other.
Physical Schema
Logical Schema
First, you should have data base installed in your machine/should have Creadentials of other database.
Orace XE is a very light database,we can use it to start a work.
Creating Master Repository
Security information and Topology information(Physical Schema OR Logical Schema information)
are kept in master repository.
I have installed XE in my local machine and has a schema SYSTEM.
To create master repository,
Start menu-----> All Programme---->Oracle------>Oracle data integrator---->
Repository Management ---->Master Repository Creation. Enter details,
Click on test connection,It should successful.Click OK,it will be created in few seconds.

Once Master Repository created ,We have to create Work Repository.
Creating Work Repository
Your work(We will see that ProcedureInterface/Package) will be stored into work repository.
To create Work Repository,
Start menu-----> All Programme---->Oracle------>Oracle data integrator---->
Topology manager.
***Physical and Logical schema are like body and soul,they are link to each other.
Physical Schema
Logical Schema